

We adjusted the valves on my Uncles Insight this morning. We looked for a write up with pics before we started but didn't find one (Maybe I just didn't look hard enough, not sure)...Anyways we photographed the process in case it would help anyone out in doing their own valve adjustment, it's really a very easy procedure. My Uncles Insight is a 2005 and was ticking fairly loud when cold, it has 75K miles on it. We decided to do a valve adjustment just for piece of mind that they are set correctly.
Start with the engine cold! This is a MUST to get the valve clearance set correctly. I like to do the valves first thing in the morning after the car has sat all night.
Next place the parking brake on and place the transmission in neutral, this way the engine is disengaged from the transmission and you can rotate the engine over by hand when needed later on.
Tools: You will need a 19mm open end wrench, 17mm open/box end wrench, 10mm socket/ratchet, 10mm open/box end wrench, screw driver, feeler gauges.
Start by removing the three 10mm bolts that hold the plastic cover onto the top of the engine. Remove the plastic cover and set it aside along with the three bolts/washers.
![Image]()
This is what it will look like underneath the plastic cover. You can see the valve cover and several hoses that need to be moved out of the way.
Starting with the rear red arrow that I've labeled number "1", remove the nut/stud. Once it's removed you can slide the bracket underneath the stud up over the remaining stud and out of the way. Once the bracket is out of the way re-install the stud into the valve cover so it doesn't get lost.
Next remove the 10mm bolt on the right side of the valve cover that is holding the hose, I've labeled this one number "2". Move the bracket to the side and re-install the bolt back in the valve cover so it doesn't get lost.
Next remove the 10mm bolt on the left side of the valve cover that is holding the hose bracket to the valve cover. I've labeled this one number "3" in the pic. Place the bolt in a Jar or something similar so it won't get lost.
Next take a pair of pliers and slide back the clips holding the two hoses onto the top front of the valve cover, I've added two arrows pointing to the clips. Twist the hose as you pull them to get them to pop free, it may be helpful to take a flat bladed screw driver and gently pry the hoses loose as you pull them if they are stuck.
![Image]()
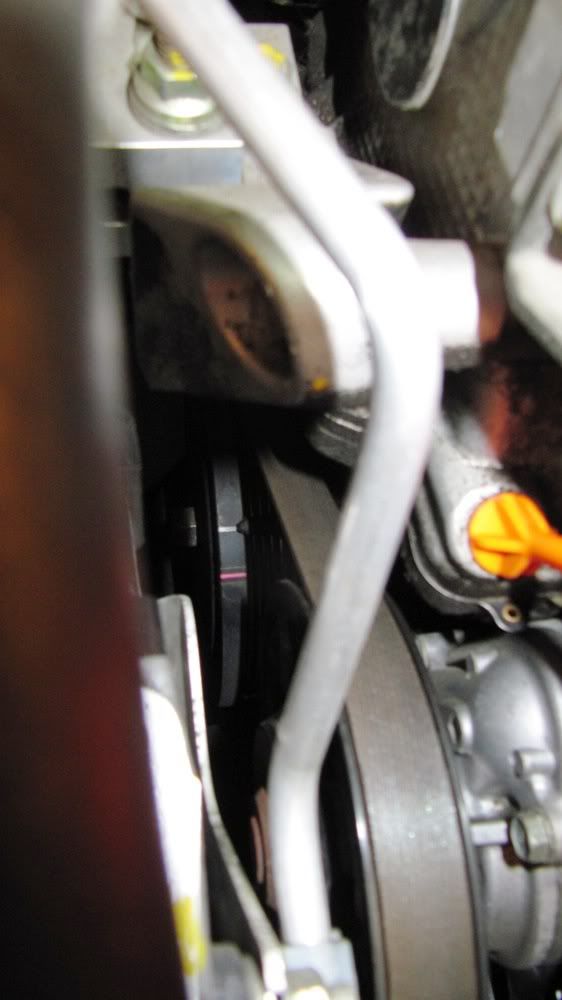
Your valve cover should look like this at this point.
Finally remove the remaining 10mm bolts around the base of the valve cover, place them in the jar so they won't get lost. At this point the valve cover is free and can be lifted up off the engine and set to the side.
NOTE: Two of the valve cover bolts are a different color than the others. The two corner bolts on the passenger side (Left Side) of the valve cover are black, the rest are gold colored. The black bolts have a thicker shank than the gold ones and are used to align the valve cover, take note of the holes that the black headed bolts come out of and re-install them in the same spot upon reassembly.
![Image]()
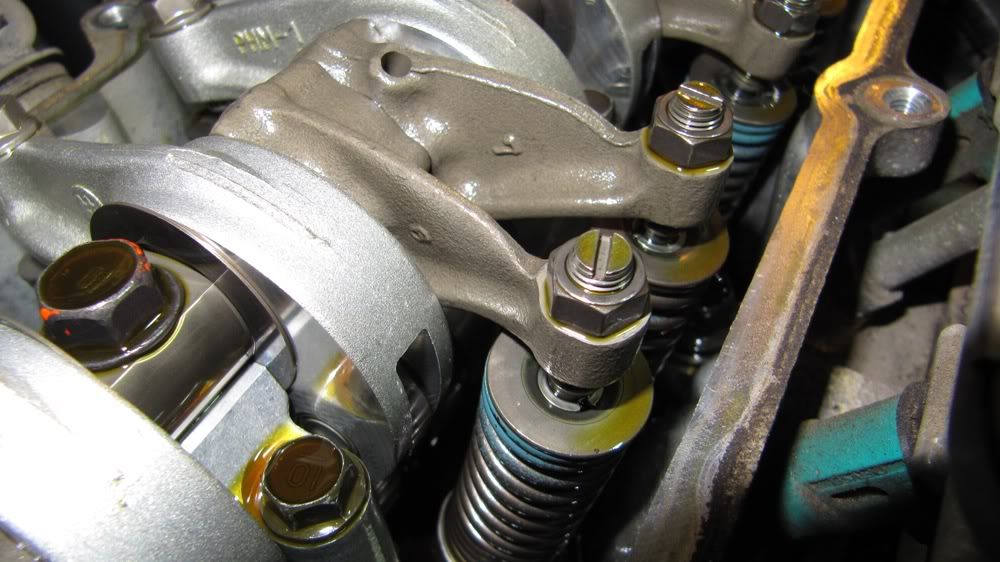
At this point you can see the valves. Now we need to get the engine rolled over to TDC (Top Dead Center) on the number 1 cylinder to start the adjustment procedure. The number 1 cylinder is the one closest to the camshaft sprocket...or closest to the passenger side of the car.
Using a 19mm open end wrench turn the nut on the crank pulley in a clockwise direction until the white line on the crank pulley lines up with the pointer, the white mark is Top Dead Center (TDC).
![Image]()
Continued below....They only let you include 4 images per post for some weird reason...hmmmmm. So I'll just break it up in a few posts.
Start with the engine cold! This is a MUST to get the valve clearance set correctly. I like to do the valves first thing in the morning after the car has sat all night.
Next place the parking brake on and place the transmission in neutral, this way the engine is disengaged from the transmission and you can rotate the engine over by hand when needed later on.
Tools: You will need a 19mm open end wrench, 17mm open/box end wrench, 10mm socket/ratchet, 10mm open/box end wrench, screw driver, feeler gauges.
Start by removing the three 10mm bolts that hold the plastic cover onto the top of the engine. Remove the plastic cover and set it aside along with the three bolts/washers.
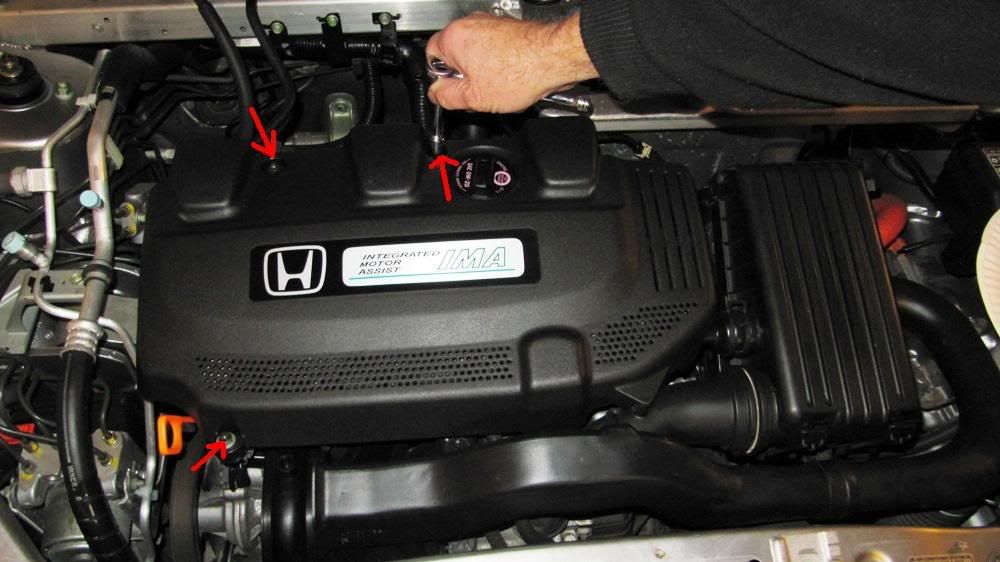
This is what it will look like underneath the plastic cover. You can see the valve cover and several hoses that need to be moved out of the way.
Starting with the rear red arrow that I've labeled number "1", remove the nut/stud. Once it's removed you can slide the bracket underneath the stud up over the remaining stud and out of the way. Once the bracket is out of the way re-install the stud into the valve cover so it doesn't get lost.
Next remove the 10mm bolt on the right side of the valve cover that is holding the hose, I've labeled this one number "2". Move the bracket to the side and re-install the bolt back in the valve cover so it doesn't get lost.
Next remove the 10mm bolt on the left side of the valve cover that is holding the hose bracket to the valve cover. I've labeled this one number "3" in the pic. Place the bolt in a Jar or something similar so it won't get lost.
Next take a pair of pliers and slide back the clips holding the two hoses onto the top front of the valve cover, I've added two arrows pointing to the clips. Twist the hose as you pull them to get them to pop free, it may be helpful to take a flat bladed screw driver and gently pry the hoses loose as you pull them if they are stuck.

Your valve cover should look like this at this point.
Finally remove the remaining 10mm bolts around the base of the valve cover, place them in the jar so they won't get lost. At this point the valve cover is free and can be lifted up off the engine and set to the side.
NOTE: Two of the valve cover bolts are a different color than the others. The two corner bolts on the passenger side (Left Side) of the valve cover are black, the rest are gold colored. The black bolts have a thicker shank than the gold ones and are used to align the valve cover, take note of the holes that the black headed bolts come out of and re-install them in the same spot upon reassembly.

At this point you can see the valves. Now we need to get the engine rolled over to TDC (Top Dead Center) on the number 1 cylinder to start the adjustment procedure. The number 1 cylinder is the one closest to the camshaft sprocket...or closest to the passenger side of the car.
Using a 19mm open end wrench turn the nut on the crank pulley in a clockwise direction until the white line on the crank pulley lines up with the pointer, the white mark is Top Dead Center (TDC).
Continued below....They only let you include 4 images per post for some weird reason...hmmmmm. So I'll just break it up in a few posts.


") Just right click on your thumbnailed pics and click "open with"...then click MSPaint.
Just right click on your thumbnailed pics and click "open with"...then click MSPaint.


