Honda Insight Forum banner

3D Printed 'Whirring' Trunk Latch Fix

111K views 279 replies 103 participants last post by  Jesse  
#1 · (Edited)
2019 update: I DO NOT SELL THIS PART ANYMORE. User 'Jesse' has taken over selling this part.
Please contact Jesse to purchase the part jesseholman@hotmail.com

If your trunk won't open and you only hear a 'whirring' noise when you press the button, then your trunk latch clutch (TLC) is broken.


I previously sold a mechanically superior TLC for $15 shipped anywhere in the US. ic user 'Jesse' has taken over selling the same TLC, so PM him if you'd like to order one, or paypal $15 to jesseholman@hotmail.com and be sure to include a mailing address.

Jesse now includes written instructions and picture diagrams with each part. He also put together an 18 minute instructional video that takes you through the process of removing, fixing and reinstalling that part:
youtube.com/watch?v=q-5pFLtIdxg&t=572s

The price has stayed the same at $15 mailed in the US.

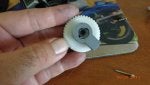
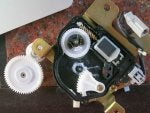
IMO removing the mechanism from the car is the most difficult part.
User 'rabl' posted detailed removal pictures.

Once the mechanism is removed, user 'gilbertguy' posted detailed pictures showing how to access the broken TLC.

You'll find the broken latch hiding under a couple gears that simply pull off.


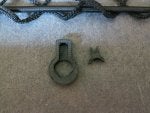
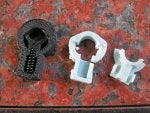
The replacement TLC has two parts: enclosure (big) and cam (small). IMO, the easiest installation method is to place the enclosure over the shaft, then insert the cam, and finally the spring. The picture below shows the installed TLC BACKWARDS, so you can see where the TLC goes. You'll want to flip the TLC the other way for actual installation (i.e. the spring won't be visible).


If you're afraid to learn, Scott (KLR3CYL) will install this part for a very fair price.

FYI: None of the 300+ latches I've sent have failed. I suspect my part will last forever, as I've designed out Honda's flaws. Design is open source, with attribution. Print your own if you've got an ABS printer:
View attachment TLC.zip
STL unit: inch
Yeah, now I'm able to open my trunk again with one hand!
 
#13 ·
The parts should last a long time... 90%ABS+10%PC won't degrade over time. Also, the main stress occurs when the latch is pressed, but it actually will increase the friction over time as the print layers are smoothed together. PLA parts and SLS parts will decay over time, but ABS is the same thing all the other plastic is made out of.

I've had the trunk latch installed now for 3 months and it doesn't show any signs of stopping. Time will tell, but my engineering experience seems to suggest that the latch fix will last a long time.
 
#15 ·
Some have asked what the repair entails. Here's my ReadMe from the downlink link in the original post:

Once you've got the parts, remove the electronic trunk latch (instructions elsewhere, I assume you can find them). With the box in hand, remove all the screws and take off the lid... don't worry, there aren't any springs or anything; it'll just lift right off once all the screws are out... nothing to lose. Once you've got it open, take the biggest gear off first, then lift off the top half of the second round gear (no need to take the 90 degree gear out). Under neath the top half of the second round gear, you'll see a smaller black friction clutch with two captive spring loaded contacts... don't worry, the springs will stay put. Lift the black friction clutch off, then also take off the bottom (white) half of the gear.

Underneath the gear, you'll see the broken remnants of the friction clutch. Take all the terribly designed broken blue bits out and throw them away, but keep the spring. Take the spring and put it in the guide on your new 3D printed parts. Unlike the original, there's nothing on the 3D printed parts to captivate the screw, so you'll need a very slight amount of skill during installation. If you can change the battery in your car, you can do this.
 
#16 ·
Can one of the several people I've sent discounted parts to please follow through with their end of the bargain and post install pictures? Five months, zero install pictures; at least four people have received a discount in exchange for a few pictures of the install. I don't want to take mine apart again ;).
 
#17 ·
I found that everything has already been done up quite nicely in several of the posts on http://www.insightcentral.net/forums/problems-troubleshooting/11569-trunk-not-opening-5.html

specifically:
Post #45 (great pictures of disassembling the actuator and what you are removing to get to the broken piece)
Post #87 is a great summation of the procedure
Post #116 - more good pictures of removing the electrical connector
Post #137 - more good info to work off of (I didnt remove the rubber pad, but others might find it helpful)

All in all I think I spent 30 minutes on this at most. The part was a tight fit, but it did fit and no dremeling required. I did remove the 3 philips head screws on the lock/latch mechanism which probably made removal easier. I would recommend somehow securing the long rod that goes over to the key after you remove it from the actuator so that it doesnt fall down between the panels of aluminum, it can be a major pain to retrieve it out of that crack (which I did, twice!)

Thanks again to mudder for the part and all the other helpful people on this forum!
 
#19 ·
From reading the original post this is Mudder's modified Protoypist design
 
#20 ·
FYI that file download link doesn't work. I'm getting an error saying I don't have access.

I already bought three of this part from prototypist and will be installing my second one soon enough, both cars have had this failure. ..or at least I think the second one does because it works intermittently. When it doesn't work the motor engaged but I don't hear the full movement of the motor, with the other car when this happened it was gone completely and I heard the motor moving. Do these ever fail in a jammed state? What's weird is a few tries later after using the key it will work fine again for me on the 2nd car.
 
#21 ·
MN Driver,

I found when I installed mine, the 'part' was a little too thick causing the operator to jam. After some sanding, being careful not to sand away the 'detent', the operator case could be closed snugly and not pinch the part, and no more jamming during operation.

I held the operator in hand to test before putting it all back in the car.
 
#22 ·
MN Driver,

I found when I installed mine, the 'part' was a little too thick causing the operator to jam.
Hey Mountain Driver, was it my part that was too thick or Prototypist's? Mine is the OEM depth on the unit I derived said depth from, so if your part had issues, I'd like that feedback so I can add a bit more tolerance.

FYI: My part is not a derivative of Prototypist's; it's a completely new design, as both Honda's OEM and Prototypist's design are the same fundamentally flawed mechanism (no disrespect; Prototypist accurately copied Honda's lousy design).
 
#23 ·
mudder:

I have proto's part. So far so good, seems durable, it's been in place for 2 years.

Other folk have installed proto's and did not have to sand.

Pretty good deal, $5 plus 22cents shipping.

I definitely recommend an op test while holding the operator in hand, (rather than install for op test).
 
#25 ·
Received Mudder's part today and installed this evening. Total install time around 25 minutes. A lot better than the stock brittle part and works great!
 
#31 ·
just put this in and surprised how easy and now haw smooth it works. Thanks Mudder
Thanks for the install pictures! Note that the part is installed backwards from my recommendation: the side that the smaller part is entirely visible on should face away from the gear, to prevent the smaller part from rubbing against the gear. I made a note of this in my original post, as I, too, show it the way you do. It will work either way, but might stop working if installed backwards and the small part rubs against the gear.
 
#33 ·
The plug harness sound the hatch sometimes gets corroded. If that happens, your hatch motor will not get power.
 
#36 ·
Can I get a "Woohoo" ?!?! :D

I got my 3-D printed part the other day, tackled the install this evening, and now my hatch latch works like a charm. Thanks to mudder for the part, and to everyone who's worked out the steps and posted pictures!

The process was fairly straightforward, though "easy" might be a stretch the first time through. But really, all I had to do was search the forum and find clues through the tricky parts. If I can do this, anybody can.

What cost me time were just stupid things. Dropping a small plastic sleeve TWICE into the spare tire well and having to unscrew the wheel to retrieve it.... etc.

Helpful to wear a headlamp (hands-free flashlight) and have a #10 socket wrench, small Phillips head screwdriver, and a couple of pliers handy.

A few more install pictures below. The rest are in my Photo Gallery.
 

Attachments

#37 ·
Hey all,
Designed a mechanically superior electronic trunk latch clutch to fix the very common "trunk latch button engages whirring noises" problem:


If you've got a high quality 3D printer, here's the STL:
FileSnack | Easy file sharing
My Dimension SST printout works perfectly and there's no chance it'll break. If you're using a cheaper (sub-$5000) printer, YMMV, but you can obviously still try.

These two parts replace the terribly designed blue clutch inside the trunk latch release:


Here it is installed (you'll want to flip it around the other way for installation, and you'll need to put it on the shaft before installing... I'm just showing where it goes):


If you'd like, I'm willing to send the printed part to whomever wants it for $15*, including CONUS shipping (that's just over break even for me). Send me a PM and I'll drop one in the mail. Certainly much cheaper than buying a replacement from the dealer, which will still have the poorly designed blue part inside ;). If you have a buddy who also has a broken trunk latch, I'll sell you 2 for $25 shipped. FYI: you don't need two for your one car; many have ordered two... I imagine for stockpiling.

Yeah, now I'm able to open my trunk again with one hand!

FYI: I'm familiar with Prototypist's previous efforts to 3D print the part. Great job on his design; my goal was to redesign the part to remove the weak link in Honda's design. Happy Insighting!

*Original price was $10 shipped. I never intended to make a profit selling these latches - just to give back to the community - but I hadn't anticipated the time commitment: I just (05/26/2014) sent out the 60th $10 latch and have thus far pocketed just $28.80. I'm not in this for the money, but simply can't continue selling them for $10. At $15, I still feel I'm giving back to the community, but I also feel that it's worth my time to continue offering parts. Of course, the parts are still open source (with attribution) and you can still print your own or pay a commercial service to print them for you (e.g. RedEye charges ~$25 each, with $125 minimum order and 10 business day turn).
On my 2002 Insight, the hidden hatch release button does not work...no "whirling" sounds or any sound at all...but I can turn the key and press the button at the same time to open the hatch. Is this the problem your solution-part addresses?
dickroos
 
#38 ·
Probably not... the only thing I could think of is if the OEM clutch broke and somehow lodged itself in the 'open' position, but then I would think the trunk would never close, unless the rod isn't connected properly.

I suspect your issue is the faulty wiring issue discussed a few post up in this thread. Best to take it apart and let us know what you find.