
Tired of that broken driver's side window switch?
Why not print your own replacement switch parts?
The files are open source (with attribution):
View attachment Insight Window Switch.zip
I initially offered these for sale, but have stopped for three reasons:
-Lack of demand; I've only sold a handful of units.
-I'm not making enough to make it worth my trouble at this low volume.
-Too much customer support. Yes, the dashboard has to come out") ... Yes, there's a thread on how to do that. No, I won't walk you through it on the phone. *ahem*.
... Yes, there's a thread on how to do that. No, I won't walk you through it on the phone. *ahem*.
I stand behind the product I've already shipped, and will warrant those units in the field, if needed; to date, I haven't had a single return for any 3D printed part I offer.
Here's how to install:
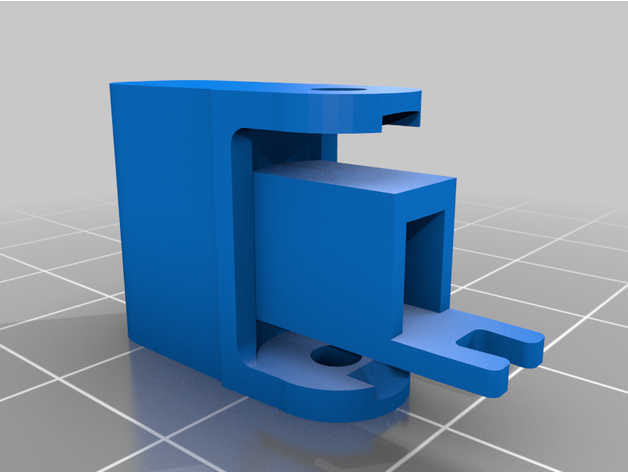
There are two design defects in the driver's side window switch:
Spring Detent Body: Terribly designed... I imagine this and the trunk latch mechanism were designed by the same intern.
[/url]
The new design is mechanically superior.
-Body thickness increased 30%
-Added a foot that extends down to the PCB; operating the switch now compresses the body, whereas the OEM design experienced shear force (an order of magnitude weaker).
Light Pipe: Also the mechanical linkage that interfaces with the electrical switch.
OEM part is decently designed, except that a light pipe is too brittle to use as a lever, particularly without a hard mechanical stop. The new part is opaque, so the switch will no longer light up at night; VeroClear is the only strong enough clear material and it's only available on high end PolyJet machines... if there's enough demand, we could do a group buy.
Kudos to user Element6 for sending me his broken window switch. Mine isn't actually broken, but I figure this is a fairly common failure that needs fixing.
If you're not comfortable opening up your broken window switch, PM me and we can arrange to ship your entire unit to me; I'll fix it and send it back for $45 (including return shipping CONUS).
Note the feel with 3D printed parts feels softer than OEM - but is still tactile - due to the layering method used in 3D printing. A PolyJet print (group buy) would feel more like OEM, but would also be more expensive.
*You'll likely need a high end 3D printer to resolve these small, dimensionally precise parts. I'm printing drop-in ABS parts on a $30,000 Stratasys SST, but I imagine any machine over $3000 will do a decent job with just a bit of sanding. FYI: Parts printed in PLA won't hold up to the heat/UV.
Why not print your own replacement switch parts?
The files are open source (with attribution):
View attachment Insight Window Switch.zip
I initially offered these for sale, but have stopped for three reasons:
-Lack of demand; I've only sold a handful of units.
-I'm not making enough to make it worth my trouble at this low volume.
-Too much customer support. Yes, the dashboard has to come out
... Yes, there's a thread on how to do that. No, I won't walk you through it on the phone. *ahem*.I stand behind the product I've already shipped, and will warrant those units in the field, if needed; to date, I haven't had a single return for any 3D printed part I offer.
Here's how to install:
Spring Detent Body: Terribly designed... I imagine this and the trunk latch mechanism were designed by the same intern.
[/url]
The new design is mechanically superior.
-Body thickness increased 30%
-Added a foot that extends down to the PCB; operating the switch now compresses the body, whereas the OEM design experienced shear force (an order of magnitude weaker).
Light Pipe: Also the mechanical linkage that interfaces with the electrical switch.
OEM part is decently designed, except that a light pipe is too brittle to use as a lever, particularly without a hard mechanical stop. The new part is opaque, so the switch will no longer light up at night; VeroClear is the only strong enough clear material and it's only available on high end PolyJet machines... if there's enough demand, we could do a group buy.
Kudos to user Element6 for sending me his broken window switch. Mine isn't actually broken, but I figure this is a fairly common failure that needs fixing.
If you're not comfortable opening up your broken window switch, PM me and we can arrange to ship your entire unit to me; I'll fix it and send it back for $45 (including return shipping CONUS).
Note the feel with 3D printed parts feels softer than OEM - but is still tactile - due to the layering method used in 3D printing. A PolyJet print (group buy) would feel more like OEM, but would also be more expensive.
*You'll likely need a high end 3D printer to resolve these small, dimensionally precise parts. I'm printing drop-in ABS parts on a $30,000 Stratasys SST, but I imagine any machine over $3000 will do a decent job with just a bit of sanding. FYI: Parts printed in PLA won't hold up to the heat/UV.