
***FINAL EDIT (I hope) If you have previously read this how-to please note that step 12 has been added due to an oversight ( Thanks 02") ) Sorry folks***
) Sorry folks***
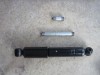
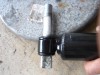
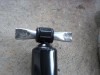
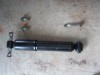
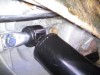
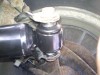
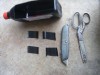
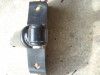
Hello everyone I finished this project yesterday but had to wait until I had some free time to post. After doing some research Saturday night regarding drilling rubber and even Googling "expanding rubber bushings" I was lead to a few 4x4 forums and was given an even better idea of fabricating bar-pin mounts for the fresh Monroe 5752 shock. This way the integrity of the bushing is intact and there is no need to tear apart your old Honda shock saving time!!!
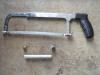
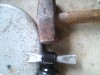
It was quite an easy job and after completing the first the second one took me all of 30 minutes from beginning to it being mounted on the car. So figure 1-2 hours depending on your tools, skill, etc.
I drive a car-hauler for a living and ran it by the shop foreman this morning. To my amazement he told me that they used to fabricate bar-pin mounts for "The Race Car" some years back out of bar stock. When I asked him how he thought these would hold up he said that as the car is so light there should be no problems. Additionally I see the tubing used for off-road 4x4's and this isn't much different.
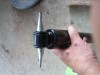
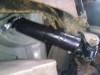
The Monroe 5752 is labeled on the box as a light truck shock. After a long test drive yesterday I feel that the dampening is way better. The car corners well, doesn't skip on curves anymore (though I had a broken shock), and the bumps don't seem to be so jolting.
As this has been a group effort IMO thanks to all who have done the research as I am a new comer to this topic and thanks for this forum and letting me contribute my two cents
) Sorry folks***Hello everyone
I finished this project yesterday but had to wait until I had some free time to post. After doing some research Saturday night regarding drilling rubber and even Googling "expanding rubber bushings" I was lead to a few 4x4 forums and was given an even better idea of fabricating bar-pin mounts for the fresh Monroe 5752 shock. This way the integrity of the bushing is intact and there is no need to tear apart your old Honda shock saving time!!!It was quite an easy job and after completing the first the second one took me all of 30 minutes from beginning to it being mounted on the car. So figure 1-2 hours depending on your tools, skill, etc.
I drive a car-hauler for a living and ran it by the shop foreman this morning. To my amazement he told me that they used to fabricate bar-pin mounts for "The Race Car" some years back out of bar stock. When I asked him how he thought these would hold up he said that as the car is so light there should be no problems. Additionally I see the tubing used for off-road 4x4's and this isn't much different.
The Monroe 5752 is labeled on the box as a light truck shock. After a long test drive yesterday I feel that the dampening is way better. The car corners well, doesn't skip on curves anymore (though I had a broken shock), and the bumps don't seem to be so jolting.
As this has been a group effort IMO thanks to all who have done the research as I am a new comer to this topic and thanks for this forum and letting me contribute my two cents